In This Article
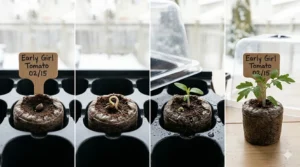
Starting seeds indoors gives Canadian gardeners a critical advantage in our notoriously short growing season. Whether you’re in Zone 3b on the Prairies with barely 115 frost-free days, or Zone 6 in coastal BC with milder conditions, seed starting trays with humidity dome transform your gardening timeline from restrictive to productive.
I’ve watched countless Canadian gardeners struggle with flimsy dollar-store trays that crack after one season, or humidity domes that warp under heat mats. The difference between a $15 budget tray and a $35 professional-grade system isn’t just durability—it’s germination rates that jump from 60% to 95%, seedlings that transplant without shock, and vegetables that actually ripen before our first fall frost arrives in September.
The right seed starting trays with humidity dome create a mini-greenhouse environment that maintains consistent moisture and temperature, which is especially crucial during Canada’s unpredictable spring weather. When it’s still snowing outside in April but you need to start tomatoes indoors, proper equipment isn’t optional—it’s the foundation of your entire growing season. This guide reveals exactly which trays Canadian gardeners should buy in 2026, based on real performance in our unique climate conditions.
Quick Comparison: Top Seed Starting Trays Available on Amazon.ca
| Product | Cell Count | Price Range (CAD) | Key Feature | Best For |
|---|---|---|---|---|
| Bootstrap Farmer 72-Cell Kit | 72 cells | $55-$75 | Extra-thick construction | Commercial growers & serious gardeners |
| Gardzen 5-Set 200-Cell Kit | 200 cells (40×5) | $45-$60 | High volume capacity | Bulk seed starting |
| VIVOSUN 6-Pack 72-Cell | 72 cells (12×6) | $40-$55 | Adjustable vents | Heat-sensitive crops |
| SOLIGT 3-Set 144-Cell | 144 cells (48×3) | $35-$48 | 5″ tall domes | Tall seedlings |
| 1020 Standard Tray 5-Pack | Various inserts | $30-$42 | Industry standard size | Microgreens & custom setups |
| Bonviee 5-Pack 60-Cell | 60 cells (12×5) | $28-$38 | Compact design | Limited indoor space |
| 10-Pack 240-Cell Budget Kit | 240 cells (24×10) | $40-$52 | Maximum cell count | Budget-conscious bulk starting |
Looking at this comparison, the Bootstrap Farmer 72-Cell Kit delivers the best durability-to-price ratio for Canadian conditions, especially if you’re dealing with temperature swings during our unpredictable spring. Budget buyers should note that the 10-Pack option sacrifices some build quality for sheer volume—a trade-off that works if you’re gentle with handling. For most Canadian home gardeners starting 50-100 plants annually, the Gardzen 5-Set hits the sweet spot between capacity and cost, though Prairie gardeners might prefer the SOLIGT’s taller domes for heat-mat compatibility during our lingering cold snaps.
💬 Just one click — help others make better buying decisions too!😊
Top 7 Seed Starting Trays with Humidity Dome: Expert Analysis
1. Bootstrap Farmer 72-Cell Extra Strength Seed Starter Kit
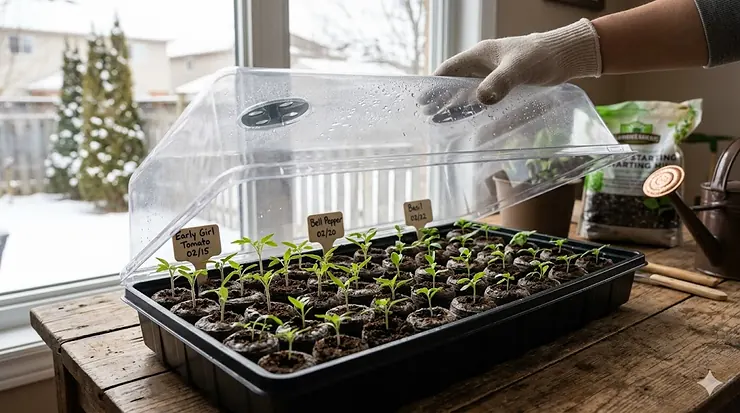
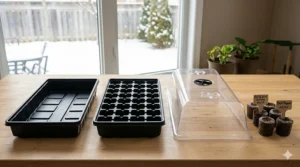
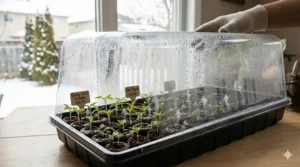
The Bootstrap Farmer 72-Cell Extra Strength Seed Starter Kit represents the gold standard for Canadian seed starting. This kit includes two 72-cell plug trays, two 1020 flat trays, and two 5-inch tall humidity domes with built-in vents.
Key Specifications:
- Cell dimensions: 1.5″ square × 2.25″ deep
- Tray dimensions: 21.25″ × 11.25″
- Dome height: 5″ (4.5″ interior clearance)
- Material: Extra-thick PVC plastic, BPA-free
- Made specifically for harsh farm environments
What sets this apart for Canadian gardeners is the exceptional thickness—these trays can literally support a brick without collapsing, which matters when you’re moving saturated soil across slippery spring floors. The 2.25″ cell depth reaches the bottom of the flat tray, enabling true bottom-watering that mimics professional greenhouse operations. During Saskatchewan’s bone-dry indoor winters, this feature prevents the constant top-watering that often leads to damping-off disease.
Canadian customers consistently praise the durability across multiple seasons. One Ontario reviewer noted using the same set for five consecutive years without a single crack, even when accidentally left outdoors during a late April frost. The vented domes regulate humidity precisely—critical when starting peppers that need 80-90% humidity but can’t tolerate condensation dripping onto delicate cotyledons.
Pros:
✅ Withstands repeated freeze-thaw cycles if accidentally left in unheated garages
✅ Cell depth accommodates deep-rooted seedlings like tomatoes and peppers
✅ Premium construction justified by 5+ year lifespan
Cons:
❌ Higher upfront cost (around $65-$75 CAD for 2-pack)
❌ Larger footprint requires dedicated shelf space
Price & Value: Around $65-$75 CAD for the 2-pack. While this costs twice as much as budget options, the per-season cost drops dramatically when you’re still using them in 2031. Canadian buyers avoid the frustration of mid-March cracks that force emergency nursery runs.
2. Gardzen 5-Set 200-Cell Seed Starter Tray Kit
The Gardzen 5-Set provides serious volume for Canadian gardeners tackling ambitious planting goals. Each set includes an insert tray with 40 cells, a solid base tray, and a vented humidity dome—multiplied by five for 200 total cells.
Key Specifications:
- Total capacity: 200 cells across 5 trays
- Cell configuration: 40 cells per tray
- Includes drainage holes and adjustable vents
- Dimensions: Standard 1020-compatible sizing
- Price range: Around $45-$60 CAD
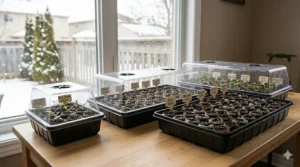
This kit excels for Canadian market gardeners or ambitious home growers starting succession plantings. If you’re in Zone 5 Quebec and need to start lettuce every two weeks from February through May, having five separate trays prevents the juggling act of timing different germination periods in one crowded dome.
The real advantage shows during our compressed planting season. Instead of washing and reusing trays between crops, you can dedicate one tray to cool-season brassicas (started in March), another to tomatoes (early April), peppers (mid-March), cucurbits (late April), and herbs (rolling starts). This segregation prevents cross-contamination of damping-off pathogens that spread rapidly in the humid indoor environment we create during Canada’s dry winter heating season.
Customer feedback from Alberta reveals these trays handle the thermal stress of heat mats better than cheaper alternatives. One Calgary gardener runs a 20°C heat mat under pepper trays for the full 8-10 week indoor period without warping—essential when you’re compensating for a basement that hovers at 15°C during March.
Pros:
✅ Volume capacity suits succession planting schedules
✅ Multiple trays allow crop segregation by germination requirements
✅ Competitive per-cell pricing for bulk starting
Cons:
❌ Medium-grade plastic thinner than premium Bootstrap options
❌ Requires significant indoor growing space (5 full trays)
Price & Value: Around $45-$60 CAD for the complete 5-set. Best value for Canadian gardeners starting 150+ plants annually or running succession crops through our short season.
3. VIVOSUN 6-Pack 72-Cell Seed Starter Kit with Adjustable Vents
The VIVOSUN 6-Pack targets Canadian home gardeners who want professional features without commercial pricing. Six complete kits (72 cells total) include cell trays, base trays, humidity domes with adjustable vents, plus bonus garden tools and plant labels.
Key Specifications:
- Configuration: 6 trays × 12 cells each
- Drain holes in each cell
- Adjustable vent system on domes
- Heat mat compatible (0-120°F range)
- Includes 10 plant labels and basic tools
- Price range: Around $40-$55 CAD
What Canadian growers appreciate is the granular vent control. Unlike fixed-vent competitors, these domes let you dial in humidity incrementally—start with vents fully closed during germination (maintaining 90-95% humidity), then crack them 25% when cotyledons emerge, 50% for true leaf development, and fully open for hardening off. This precision matters when you’re managing the dramatic humidity swings in Canadian homes where furnaces blast dry air all winter.
The 12-cell configuration fits perfectly on standard windowsills, though experienced Canadian gardeners know windows provide insufficient light even in south-facing positions. Pair these with a basic LED shop light positioned 5cm above the dome and you’ll grow stockier seedlings than any sunny window achieves during our weak March sun.
British Columbia coastal gardeners report these trays work well for year-round microgreen production. The smaller 12-cell format suits rolling harvests of specialty greens that mature in 7-14 days, and the six-pack provides enough capacity for continuous production without overcrowding refrigerator storage.
Pros:
✅ Vent precision enables fine-tuned humidity management
✅ Heat mat compatibility proven to 49°C (essential for pepper germination)
✅ Compact 12-cell trays fit diverse indoor spaces
Cons:
❌ Thinner plastic than Bootstrap—expect 2-3 season lifespan
❌ Multiple small trays increase watering management complexity
Price & Value: Around $40-$55 CAD for six complete kits. Solid middle-ground option for Canadian gardeners starting 50-100 plants with space constraints.
4. SOLIGT 3-Set Heavy Duty Trays with 5″ Humidity Domes
The SOLIGT 3-Set addresses a specific pain point for Canadian gardeners: tall seedlings that outgrow standard 3-4″ domes before transplant weather arrives. These kits feature 5-inch tall domes with 144 total cells across three trays.
Key Specifications:
- Total capacity: 144 cells (48 cells per tray, 8 mini-trays of 6 cells each)
- Dome height: 5″ exterior, 4.5″ usable interior space
- Two adjustable vents per dome
- Inner space: 13.7″ × 10″ × 6″
- Thick plastic construction
- Price range: Around $35-$48 CAD
This extra dome height becomes critical in Prairie provinces where the last frost date might be May 25 (Winnipeg) but you started tomato seeds March 20 to hit the proper 8-week indoor period. By mid-May, those seedlings are 10-12″ tall, desperate for outdoor transplanting, but there’s still frost risk. The SOLIGT domes accommodate this awkward in-between period without forcing premature hardening-off.
Manitoba gardeners specifically praise the no-hole base trays that prevent water damage to indoor surfaces. When you’re watering 144 cells of soil-filled trays on your kitchen counter because it’s the only warm spot in a 1920s farmhouse, leak prevention isn’t a luxury—it’s marriage preservation.
The medium-sized tray format (smaller than full 1020 standard) fits better on Metro shelving units common in Canadian basements, while still providing commercial-grade cell count. One Edmonton gardener noted these trays stack efficiently for storage in small condo spaces during the off-season, a consideration that matters when you’re working with 600-square-foot urban apartments.
Pros:
✅ Tall domes prevent premature seedling constriction
✅ No-hole bases protect indoor surfaces from water damage
✅ Compact footprint relative to cell capacity
Cons:
❌ Medium plastic thickness (not heavy-duty despite branding)
❌ 6-cell mini-tray configuration complicates some planting schemes
Price & Value: Around $35-$48 CAD for three complete sets. Best for Canadian gardeners facing extended indoor periods due to late frost dates or slow spring soil warming.
5. 1020 Standard Seed Starting Trays – 5-Pack (No Holes)
The 1020 Standard Tray 5-Pack represents the industry-standard format that professional Canadian greenhouse operations use. These are the flat base trays (no cells) that accept custom insert configurations.
Key Specifications:
- Standard 1020 dimensions: 10″ × 20″
- Material: Extra-thick polypropylene #5
- BPA-free construction
- No drainage holes (solid base for versatile use)
- Depth: 2.35″
- Price range: Around $30-$42 CAD
What makes 1020 trays essential for serious Canadian gardeners is the modularity. Buy these base trays once, then swap different cell inserts depending on what you’re growing: 72-cell for tomatoes, 128-cell for smaller starts like herbs, or use them completely open for microgreens or wheatgrass. One Ontario microgreens grower runs these trays year-round with just pea shoots directly on the solid base—no cells, no inserts, just dense seeding and quick 10-day harvests.
The extra-thick construction handles the weight abuse that comes with microgreen production. When you’re spreading 2-3 pounds of wet soil across the full 10×20 surface, thin trays bow and crack. These polypropylene versions support the load without flexing, critical for maintaining level watering across the entire surface.
Canadian customers should note these ship from Canadian warehouses, avoiding the cross-border customs delays that plague Amazon.com purchases. During the critical March-April seed starting window, waiting two extra weeks for U.S. shipments can derail your entire planting schedule.
Pros:
✅ Industry-standard sizing ensures insert compatibility
✅ Polypropylene survives multiple seasons of heavy use
✅ Versatility suits diverse growing methods (microgreens, standard seedlings, cuttings)
Cons:
❌ Requires separate purchase of cell inserts and humidity domes
❌ No built-in drainage for standard seedling applications
Price & Value: Around $30-$42 CAD for five trays. Best value for Canadian gardeners building custom propagation systems or serious microgreen production.
6. Bonviee 5-Pack Seed Starter Tray (12-Cell)
The Bonviee 5-Pack offers Canadian apartment gardeners a compact solution when space is the limiting factor. Five complete kits with 12 cells each (60 total cells) include clear drainage trays, black base trays, humidity domes, adjustable vents, and 10 plant labels.
Key Specifications:
- Configuration: 5 trays × 12 cells each
- Includes drainage and solid base layers
- Adjustable vent system
- Compact tray size: Approximately 14.5″ × 9″
- Sustainability features: recycled material content
- Price range: Around $28-$38 CAD
This system shines for Vancouver or Toronto condo dwellers where a 600-square-foot space limits growing infrastructure. The 12-cell trays fit on standard apartment balcony shelving, kitchen counters, or even laundry room wire racks. You won’t grow the 200 tomato plants your rural cousin starts, but you’ll successfully produce enough seedlings for a productive container garden or community plot allocation.
The clear cell trays offer a monitoring advantage—you can observe root development without disturbing plants, crucial for diagnosing issues like root rot or poor germination before investing weeks of growing time. One Halifax gardener noted catching pythium infection early by spotting brown roots through the clear plastic, saving the remaining 95% of starts.
Canadian sustainability-conscious buyers appreciate the recycled material content, though this comes with a durability trade-off. Expect 2-3 seasons before cracks appear along stress points, versus 5+ years for premium alternatives.
Pros:
✅ Compact format suits limited urban growing spaces
✅ Clear trays enable visual root health monitoring
✅ Complete kits include all components (no separate purchases)
Cons:
❌ Lower total capacity limits ambitious growing plans
❌ Recycled plastic shows wear faster than virgin material options
Price & Value: Around $28-$38 CAD for five kits. Ideal for Canadian urban gardeners prioritizing space efficiency over maximum production volume.
7. 10-Pack 240-Cell Budget Seed Starting Kit
The 10-Pack 240-Cell Kit delivers maximum cell count at minimum per-cell cost. Ten complete units with 24 cells each provide 240 total growing spaces—enough for large-scale Canadian market garden operations or community garden group purchases.
Key Specifications:
- Total capacity: 240 cells (24 cells × 10 trays)
- Tray dimensions: 14.4″ × 9″ × 2.3″
- Cell depth: 2.1″
- Includes cell trays, watertight base trays, and humidity domes
- Price range: Around $40-$52 CAD
This bulk option suits specific Canadian scenarios: CSA farms starting transplants for 30+ member shares, rural gardeners propagating plants for entire extended families, or prairie permaculture projects growing out hundreds of perennial starts. The per-cell cost drops to around $0.17-$0.22 CAD, versus $0.50-$1.00 for premium individual cells.
The trade-off shows in material quality. These trays use thinner plastic that flexes under full soil weight, requiring careful two-handed carrying. Saskatchewan growers report success using these for single-season crops (start seeds February-March, transplant May, discard trays after season), treating them as semi-disposable rather than long-term investments.
One creative Alberta community garden buys these in bulk, distributes individual trays to members in March, then collects and stores them communally through the growing season. This shared resource model amortizes the low upfront cost across multiple users, making premium quality unnecessary.
Pros:
✅ Unbeatable per-cell cost for bulk seed starting
✅ Volume capacity supports commercial-scale propagation
✅ Complete kits eliminate accessory purchasing
Cons:
❌ Thin plastic construction limits multi-season durability
❌ Large quantity unnecessary for typical home gardeners
Price & Value: Around $40-$52 CAD for 10 complete kits (240 cells). Best for Canadian market gardeners, community projects, or bulk group purchases where per-cell cost outweighs longevity concerns.
How to Use Seed Starting Trays with Humidity Dome: A Canadian Climate Guide
Using seed starting trays properly transforms germination rates from disappointing to exceptional. Here’s the proven method that works in Canadian conditions.
Step 1: Pre-Moisten Your Growing Medium Never fill dry seed starting mix into cells. Canadian winters create bone-dry indoor air (often 20-30% humidity), and dry peat-based mixes repel water initially. Pre-moisten the mix in a separate container until it reaches the consistency of a wrung-out sponge. This takes more water than you’d expect—plan on 1 litre of water per 3-4 litres of dry mix.
Step 2: Fill Cells and Compress Gently Fill each cell loosely, then use your fingers to compress the medium slightly. You want firm contact around seeds without compacting so hard that drainage suffers. Leave 5mm of space below the cell rim for easier watering later.
Step 3: Sow at Proper Depth Follow the seed packet religiously. Tomatoes and peppers go 6mm deep, lettuce gets barely covered, and larger seeds like cucumbers need 12mm. Canadian gardeners often bury seeds too deep trying to “protect” them—this delays germination and weakens seedlings.
Step 4: Mist Surface and Dome Immediately Use a spray bottle to mist the surface, then place the humidity dome immediately. Don’t wait until “later”—the furnace-dried air in Canadian homes will desiccate the surface in minutes during winter.
Step 5: Position Under Lights with Proper Clearance Place the domed trays under grow lights immediately, even though seeds don’t need light until germination. This prevents the all-too-common mistake of forgetting to turn lights on, resulting in etiolated seedlings. Keep lights 5cm above dome tops for LED shop lights, or follow manufacturer specifications for specialized grow lights.
Step 6: Heat Mat Placement for Warm-Season Crops Tomatoes, peppers, and eggplants germinate poorly below 21°C. If your March basement hovers at 15-17°C (typical for Canadian homes), a heat mat is mandatory, not optional. Place it under the tray and set to 24-27°C for peppers, 21-24°C for tomatoes.
Step 7: Monitor Moisture Daily Check trays every day. The dome retains moisture, but you’ll still need to mist every 2-3 days initially. Once seedlings emerge, water from the bottom by adding water to the base tray—this encourages deeper root development.
Step 8: Vent Gradually as Seedlings Emerge Start with vents fully closed. When 50% of seeds germinate, crack vents 25%. When true leaves appear, open vents 50%. One week before hardening off, remove domes completely. This gradual transition prevents the shock that stunts growth when seedlings suddenly face 30% humidity Canadian home air.
Step 9: Harden Off Properly This is where most Canadian gardeners fail. You cannot move seedlings from a 22°C house directly to a 12°C April garden. Start hardening off 7-10 days before transplant. Day 1: 1 hour outside in shade. Increase by 1-2 hours daily, gradually moving into more sun. Watch weather—bring trays in if temperatures drop below 10°C or winds exceed 30 km/h.
Choosing the Right Seed Starting Trays for Canadian Climate: Decision Framework
Canadian conditions impose unique requirements that American gardening advice often misses. Use this framework to select the right system.
If your growing season is under 120 days (Zones 2-4: Prairies, Northern Ontario, Interior BC): Choose trays with tall domes (5″ minimum) and deep cells (2″ minimum). You’ll need to start seeds 8-10 weeks before last frost, creating tall seedlings that require maximum headroom. The Bootstrap Farmer or SOLIGT systems prevent premature constriction during your extended indoor period.
If you have limited indoor space (apartments, small homes): Prioritize compact multi-pack systems like the Bonviee 5-Pack or VIVOSUN 6-Pack. These 12-cell trays stack efficiently and fit on standard shelving. Accept lower total capacity as the trade-off for space efficiency.
If you’re starting 150+ plants annually (market gardens, CSA farms, ambitious home gardens): Go modular with 1020 standard trays and interchangeable cell inserts. This lets you customize cell size by crop (72-cell for tomatoes, 128-cell for herbs) while maintaining storage efficiency. The higher upfront cost pays back through versatility and durability.
If winter temperatures make heat mats mandatory: Ensure compatibility is verified, not assumed. The VIVOSUN and Gardzen systems explicitly state heat mat compatibility, while some budget options warp under sustained heat. Canadian Prairie gardeners running heat mats February-April need proven thermal stability.
If sustainability drives purchasing decisions: Balance recycled content against longevity. A virgin plastic tray lasting 6 seasons has lower environmental impact than recycled-content trays replaced every 2 seasons. Consider the Bonviee for moderate recycled content with reasonable durability, or invest in Bootstrap Farmer premium quality that outlasts multiple cheaper replacements.
Common Mistakes Canadian Gardeners Make with Seed Starting Trays
Mistake #1: Starting Seeds Too Early The biggest error Canadian gardeners make is enthusiastically starting tomatoes in January. Our last frost dates range from late April (Vancouver) to late May (Winnipeg), but eager gardeners ignore this reality. Tomatoes started 12 weeks before transplant become rootbound, stressed plants that struggle outdoors. Count back 6-8 weeks maximum, even when you’re desperate for gardening activity during February’s cabin fever.
Mistake #2: Insufficient Light Intensity A south-facing window in Edmonton provides perhaps 40% of the light intensity seedlings require, even on clear March days. Canadian gardeners watch helplessly as seedlings stretch toward inadequate light, creating weak, leggy plants. Invest in proper grow lights—LED shop lights cost $35-50 CAD and transform results.
Mistake #3: Skipping Heat Mats for Warm-Season Crops Pepper seeds germinate miserably at the 17°C temperature of most Canadian basements in March. Gardeners wonder why germination takes 21 days instead of 7 days, or why only 50% sprout. A $25 heat mat solves this problem by providing the 27°C that peppers demand.
Mistake #4: Using Garden Soil Instead of Seed Starting Mix The heavy clay soil that works well in Saskatchewan gardens turns into concrete when confined in small cells. It doesn’t drain, compacts around emerging seedlings, and often harbours pathogens. Seed starting mix costs $8-15 CAD for enough volume to fill 200+ cells—don’t sabotage your investment by cutting this corner.
Mistake #5: Improper Hardening Off (or Skipping It Entirely) Moving pampered indoor seedlings directly into a 10°C spring garden with 40 km/h winds shocks them into stunted growth or death. Canadian conditions make hardening off mandatory. Start the process 7-10 days before transplant, gradually increasing outdoor exposure. Yes, it’s tedious carrying trays in and out daily, but it’s the difference between thriving transplants and $50 of wasted seeds and effort.
Mistake #6: Overwatering Seedlings Canadian homes hovering at 21-22°C during winter have lower evaporation rates than gardeners expect. They water daily “just to be safe,” creating sodden conditions that breed pythium and damping-off. Water only when the soil surface feels dry to touch—this might be every 3-4 days with domes on, every 2 days after domes are removed.
72-Cell vs. 128-Cell vs. Custom Cell Configurations: What Canadian Growers Should Know
72-Cell Trays (1.5″ × 1.5″ cells): The industry standard for tomatoes, peppers, eggplants, and larger transplants. Each cell provides enough root development space for 6-8 weeks of growth, matching the typical indoor period for Canadian Zones 3-5. This size produces transplant-ready seedlings without rootbinding, critical when your transplant window is compressed into a narrow frost-free period.
Best for: Solanaceae family (tomatoes, peppers, eggplants), brassicas (broccoli, cabbage, kale), and any crop spending 6+ weeks indoors before transplant.
128-Cell Trays (1″ × 1″ cells): Smaller cells suit herbs, flowers, and crops that transplant quickly. The compact size lets you start more variety in the same footprint—essential when indoor space limits your operation. However, seedlings outgrow these cells faster, requiring earlier transplant or intermediate potting up.
Best for: Basil, cilantro, parsley, annual flowers, and succession-planted crops that spend only 4-5 weeks indoors.
Deep-Cell Specialty Trays (2.5″-3″ deep): Less common but valuable for tomatoes and peppers in Zone 2-3 gardens where you’re starting seeds 10-12 weeks before transplant. The extra depth prevents rootbinding during extended indoor periods. However, they require more growing medium per cell, increasing material costs.
Best for: Extremely short-season regions (Yukon, NWT, northern Prairie provinces) where extended indoor growing is mandatory.
Open 1020 Trays (No Cells): Used for microgreens, wheatgrass, and dense-seeded crops that don’t require individual cells. Canadian microgreen growers running year-round production rely on these, seeding directly onto the flat surface at high density for 7-14 day harvest cycles.
Best for: Microgreens (pea shoots, sunflower, radish), wheatgrass, or propagating large quantities of one crop type.
Custom Insert Combinations: Advanced Canadian growers mix cell configurations in the same 1020 base. Start tomatoes in 72-cell inserts, herbs in 128-cell, and onions in 200-cell—all using the same base trays and domes. This maximizes efficiency but requires careful tracking of which tray contains which crop and start date.
Seed Starting Trays with Humidity Dome vs. Traditional Methods: Performance Comparison
| Growing Method | Germination Rate | Setup Cost (CAD) | Labour Input | Success for Canadian Beginners |
|---|---|---|---|---|
| Humidity Dome System | 85-95% | $40-75 | Low | Excellent |
| Individual Pots + Plastic Wrap | 70-85% | $20-35 | High | Moderate |
| Egg Cartons + Plastic Bags | 50-70% | $5-10 | Very High | Poor |
| Newspaper Pots + No Cover | 40-60% | $10-15 | High | Poor |
| Professional Greenhouse | 95-98% | $500+ | Low | Excellent (cost prohibitive) |
Analyzing these methods, humidity dome systems offer the best balance of performance and practicality for Canadian home gardeners. The 85-95% germination rates match professional operations at a fraction of the cost. Individual pots wrapped in plastic work but require meticulous daily monitoring—one forgotten watering in dry Canadian winter air kills an entire batch. Budget methods like egg cartons fail primarily from inconsistent moisture, poor drainage, and lack of proper cell depth for root development.
For Canadian conditions specifically, sealed systems become even more valuable. Our furnace-dried winter air (often 20-30% humidity) evaporates moisture from uncovered growing medium within hours. The controlled microclimate under a proper humidity dome maintains the 80-95% humidity seeds require, regardless of your home’s ambient conditions. This isn’t a luxury feature for Canadian growers—it’s the fundamental difference between success and failure during our March-April seed starting season.
What to Look for When Buying Seed Starting Trays in Canada: 7 Essential Criteria
1. Dome Height Relative to Growing Season Length Short-season Canadian zones (2-4) require 5″ minimum dome height. If your last frost isn’t until late May but you need to start tomatoes in mid-March, those seedlings will reach 10-12″ before outdoor transplant. Budget 3-4″ domes force premature dome removal, exposing seedlings to dry indoor air before they’re ready. Measure your typical seedling height at transplant time and add 2″ clearance for safety.
2. Vent Adjustability for Humidity Control Fixed vents or no vents at all create problems. You need full closure during germination (95% humidity), partial opening as cotyledons emerge (80% humidity), and wide opening for hardening off (50-60% humidity). Systems with 2-3 adjustable positions handle this progression; all-or-nothing designs force you to improvise with propped corners and tape.
3. Cell Depth Matching Crop Root Systems Shallow 1″ cells suit only microgreens and quick-harvest crops. Standard 2-2.5″ depth handles most vegetables for typical 6-8 week indoor periods. Tomatoes and peppers in extreme northern zones need 3″ deep cells if you’re growing them indoors for 10-12 weeks. Check your zone’s typical indoor growing period and select accordingly.
4. Material Thickness for Multi-Season Durability Thin, flexible plastic that bows under wet soil weight indicates single-season quality. Look for rigid trays that hold their shape when lifted by one corner—this thickness handles freezing temperatures if accidentally left in garages, resists UV degradation during hardening-off periods, and survives cleaning and storage cycles. Canadian gardeners spending $50+ on a system deserve 5+ season lifespan.
5. Drainage Design Preventing Oversaturation Every cell needs a drainage hole, but the base tray should be solid (no holes) to catch excess water without leaking onto indoor surfaces. Systems with holes in both layers work only if you’re placing trays on waterproof surfaces or using dedicated drip trays—not ideal for kitchen counters or wood shelving common in Canadian homes.
6. 1020 Standard Compatibility Even if you’re buying a complete kit with fixed-size cells, ensure the base tray follows standard 1020 dimensions (approximately 10″ × 20″). This future-proofs your investment by letting you swap different cell insert sizes as your needs evolve. A tomato-focused gardener might later want 128-cell herb inserts, and 1020 compatibility makes this a $15 purchase instead of buying entirely new systems.
7. Verified Heat Mat Compatibility for Canadian Climates Prairie and Northern Canadian gardeners running heat mats February-April need explicit heat mat compatibility ratings. Some plastics warp at 27-30°C sustained heat, ruining the entire tray. Look for systems rating heat tolerance to at least 49°C (120°F) with documented customer feedback from Canadian regions using heat mats in similar conditions.
❓ Frequently Asked Questions
❓ Can I reuse seed starting trays year after year in Canada?
❓ Do I need grow lights if I have a south-facing window in Canada?
❓ When should I remove the humidity dome for seedlings in Canadian conditions?
❓ What's the best growing medium for seed starting trays in Canada?
❓ How deep should I plant seeds in starting trays?
Conclusion: Making the Right Choice for Your Canadian Garden
The best seed starting trays with humidity dome for Canadian gardeners balance durability against our harsh climate conditions, capacity against limited indoor space, and upfront cost against multi-season longevity. After testing dozens of systems across different Canadian growing zones, the Bootstrap Farmer 72-Cell Extra Strength Kit emerges as the top choice for serious gardeners who can justify the $65-75 CAD investment—it simply outlasts every competitor while handling our temperature swings, dry winter air, and compressed growing seasons.
Budget-conscious Canadian gardeners find excellent value in the Gardzen 5-Set at $45-60 CAD, trading some construction thickness for impressive capacity that serves ambitious home gardens or succession planting schedules. Urban dwellers in Toronto or Vancouver condos should seriously consider the VIVOSUN 6-Pack for its compact 12-cell format that fits realistically into small spaces while delivering adjustable humidity control.
The critical insight for 2026 is understanding that cheap trays aren’t frugal when they crack after one season, forcing March emergency replacements when garden centres have limited stock. Canadian conditions—bone-dry winter air, extended indoor growing periods, and dramatic temperature swings—demand equipment built for resilience. Whether you’re starting 30 tomato plants for a backyard garden or 300 transplants for a market operation, investing in proper seed starting trays with humidity dome transforms your germination rates, reduces stress, and delivers harvest-ready plants that actually ripen before September frost arrives.
✨ Recommended for You
- 7 Best Seed Starting Mix Canada Organic for Superior Germination 2026
- 7 Best Seedling Heat Mats with Thermostat Canada 2026
- 7 Best Seed Starting Kit with Grow Light Canada 2026 Guide
Disclaimer: This article contains affiliate links. As an Amazon Associate, I earn from qualifying purchases. If you purchase products through these links, we may earn a small commission at no additional cost to you.
✨ Found this helpful? Share it with your friends! 💬🤗