In This Article
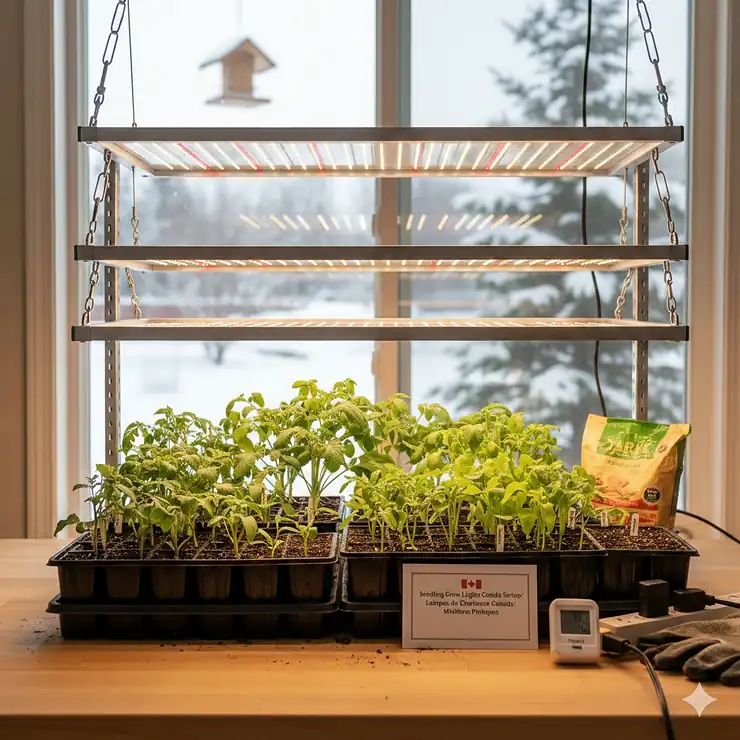
Picture this: You’ve carefully planted your tomato seeds in late February, excited about the growing season ahead. But week after week, your seedlings stretch toward the window like they’re desperately reaching for something just out of grasp. Those leggy, weak stems? That’s your plants literally crying out for proper lighting.
I learned this lesson the hard way during my first year of indoor seed starting here in Ontario. My windowsill setup produced seedlings so tall and spindly they couldn’t support themselves once transplanted. That’s when I discovered that setting up seedling grow lights Canada gardens actually need isn’t just helpful—it’s essential for our shorter growing season.
Canadian gardeners face unique challenges. With our long winters stretching from October through April in many regions, natural sunlight simply doesn’t cut it for starting seeds indoors. Whether you’re in Vancouver’s rainy climate or dealing with Edmonton’s -30°C winters, a proper seedling grow lights Canada setup bridges that gap between winter darkness and the vibrant garden you’re dreaming of.
The science is clear: seedlings require 14-16 hours of quality light daily for optimal growth. Natural window light in Canadian winters? You’re lucky to get 8-10 hours of weak, indirect sunlight. This guide covers everything from budget-friendly clip-on options under $40 CAD to professional-grade LED systems, all tested and available for Canadian gardeners through Amazon.ca.
Quick Comparison Table: Top Seedling Grow Lights for Canadians
| Product | Type | Coverage | Price (CAD) | Best For |
|---|---|---|---|---|
| Barrina T5 2FT LED (8-pack) | Strip Light | Multiple shelves | $80-110 | Budget setup |
| Spider Farmer SF1000 | Panel LED | 2×2 ft | $120-150 | Serious growers |
| VIVOSUN VS1000E | Panel LED | 2×2 ft | $90-130 | Mid-range choice |
| GooingTop Clip-on | Dual-head clip | Small area | $35-50 | Beginners |
| Spider Farmer SE1500 | Bar-style LED | 2×2 ft | $120-170 | Tech enthusiasts |
💬 Just one click – help others make better buying decisions too!😊
Top 7 Seedling Grow Lights Canada Setup: Expert Analysis
1. Barrina T5 Full Spectrum LED Grow Lights – The DIY Champion
If you’re building a multi-tier seed starting station (and honestly, who isn’t once they catch the gardening bug?), the Barrina T5 system offers incredible value for Canadian growers.
Key Specifications:
- 2-foot length, 80W total (8 × 10W fixtures)
- Full spectrum with pinkish-white light output
- Linkable design (up to 16 units)
This 8-pack system has become something of a legend in Canadian gardening forums. Each 2-foot strip pumps out bright, full-spectrum light that seedlings absolutely love. The pinkish-white colour might make your basement look like a disco, but your plants won’t mind one bit. Available on Amazon.ca for around $80-110 CAD, this is hands-down the most cost-effective solution for serious seed starters.
What sets Barrina apart is the installation flexibility. The package includes double-sided tape, clips, and cable ties—everything you need to mount these on wire shelving. I’ve watched friends link six of these together on a single shelf to create a blazing wall of light that would make any seedling weep with joy.
Canadian buyers consistently praise the energy efficiency, noting their electricity bills barely budge even running these 16 hours daily throughout March and April. One Toronto gardener reported starting 200+ seedlings under this setup without breaking the bank.
✅ Pros: Excellent value, linkable, easy installation, low heat output
❌ Cons: Pinkish light colour may bother some, requires DIY mounting
Price Range: $80-110 CAD |
Rating: 4.5/5 stars
2. Spider Farmer SF1000 LED Grow Light – The Professional’s Pick
For gardeners who’ve graduated beyond hobby status, Spider Farmer SF1000 represents a serious investment in seedling success. This is what you see in commercial greenhouse operations, scaled down for home use.
Key Specifications:
- Samsung LM301H EVO diodes
- 100W actual draw, dimmable
- Covers 2×2 ft vegetative area
Priced around $120-150 CAD on Amazon.ca, the SF1000 delivers professional-grade performance. The Samsung diodes provide exceptional light uniformity across the entire coverage area—no more rotating trays to prevent uneven growth. The dimming function lets you dial in perfect intensity as seeds germinate (low) and develop true leaves (higher).
What really impressed me was the penetration depth. Unlike cheaper LED panels where only the top leaves benefit, this light actually reaches lower foliage, promoting sturdy, bushy growth from soil level up. BC growers specifically mention using this for starting both vegetables and cannabis seedlings with outstanding results.
The aluminum heat sink keeps things cool and quiet. You can literally place your hand on the unit after hours of operation—barely warm. This matters in Canadian homes where basement growing spaces can get stuffy.
✅ Pros: Professional quality, excellent coverage, very efficient, quiet operation
❌ Cons: Higher upfront cost, might be overkill for casual growers
Price Range: $120-150 CAD |
Rating: 4.7/5 stars
3. VIVOSUN VS1000E LED Grow Light – Sweet Spot for Value
Sitting comfortably between budget and premium options, the VIVOSUN VS1000E offers remarkable bang for your buck. This is the light I recommend to friends who are upgrading from clip-ons but aren’t ready to invest in top-tier systems.
Key Specifications:
- 238 premium diodes
- 100W power draw, 2.5 μmol/J efficiency
- Full spectrum (3000K, 5000K, 660nm, 750nm)
Available for $90-130 CAD, the VS1000E punches above its weight class. The spectrum closely mimics natural sunlight, supporting everything from germination through the hardening-off phase. Manitoba gardeners particularly appreciate the versatility—they use it for seed starting in February, then move it to the greenhouse for supplemental lighting through May.
The ETL-certified driver provides peace of mind (important when running lights 16 hours daily). VIVOSUN includes bonus hanging hardware, and the IP65 waterproof rating means you can mist seedlings without worrying about water damage. Several Quebec growers mentioned using this in humid basement setups without any issues.
Customer feedback from Alberta consistently highlights the even coverage across 2×2 ft areas. No more leggy seedlings in the corners while center plants thrive.
✅ Pros: Great price-to-performance ratio, waterproof, efficient, includes hardware
❌ Cons: Slightly less powerful than SF1000, limited dimming options
Price Range: $90-130 CAD |
Rating: 4.4/5 stars
4. GooingTop LED Clip-on Grow Light – Perfect for Beginners
Not ready to commit to a full setup? The GooingTop dual-head clip-on light offers an incredibly low barrier to entry for new seed starters.
Key Specifications:
- Dual 6000K full spectrum heads
- 5-level dimming, timer (4/8/12 hours)
- 360-degree flexible gooseneck
At just $35-50 CAD on Amazon.ca, this little powerhouse introduces countless Canadians to indoor seed starting. I started with something similar before building my larger system, and honestly, it’s perfect for testing the waters. Each head has 44 LEDs providing enough light for 2-4 seedling trays depending on plant type.
The timer function is brilliant for busy people. Set it once, and your seedlings get consistent 12-hour days even when life gets hectic. The gooseneck design means you can position lights exactly where needed—crucial when you’re working with limited space on a kitchen counter or office desk.
Saskatchewan buyers particularly love these for apartment growing, noting the compact size and ability to clip onto shelving units or even large plant pots. The USB power option adds flexibility—you can run this from a computer, wall adapter, or power bank.
✅ Pros: Very affordable, compact, timer function, easy setup, no tools required
❌ Cons: Limited coverage area, not suitable for large seedling operations
Price Range: $35-50 CAD |
Rating: 4.2/5 stars
5. Spider Farmer SE1500 LED Grow Light – Tech-Forward Choice
The Spider Farmer SE1500 represents the future of home growing with its app-controlled functionality and bar-style design.
Key Specifications:
- Bridgelux 3030 diodes
- 150W, 428 μmol/S PPF
- Bluetooth and WiFi app control
This $120-170 CAD light might seem extravagant until you experience the convenience. Through the Spider Farmer app, you can schedule lighting cycles, adjust intensity, and monitor runtime from anywhere. Forgot to turn off the lights before leaving for a weekend? Handle it from your phone.
The bar-style design provides exceptionally uniform light distribution—think of it as multiple light sources rather than one bright spot. This eliminates hot spots and shadows, promoting even growth across all seedlings. Ontario greenhouse operators use these commercially, which speaks volumes about reliability.
Canadian tech enthusiasts appreciate the data logging features. You can track exactly how many hours your lights run, helping calculate electricity costs and optimize schedules. The plug-and-play design requires zero assembly—literally unbox, hang, and connect to Wi-Fi.
✅ Pros: App control, excellent uniformity, professional-grade, energy efficient
❌ Cons: Premium pricing, smartphone required for full features
Price Range: $120-170 CAD |
Rating: 4.6/5 stars
6. Barrina T5 1FT LED Grow Lights (4-Pack) – Space-Saver Solution
For Canadian growers working with limited space, the Barrina 1FT version offers full-spectrum lighting in a compact footprint.
Key Specifications:
- 1-foot length, 20W (4 × 5W)
- 5000K white full spectrum
- Magnetic installation option
These shorter strips ($40-60 CAD for 4-pack on Amazon.ca) are perfect for narrow shelves or small grow tents. The magnetic mounting is genius—they stick directly to metal wire shelving without any clips or ties. I’ve seen creative Vancouver apartment dwellers mount these inside kitchen cabinets for year-round herb growing.
The 5000K colour temperature provides a clean white light that won’t bother family members if you’re growing in shared living spaces. Unlike the pinkish 2-foot version, these blend into modern home aesthetics while delivering excellent growing power.
What surprised me most was the efficiency. Running four of these uses less power than a standard 60W incandescent bulb, yet provides significantly more useful light for plants. Nova Scotia gardeners mention using these in basement cold rooms where space is at a premium.
✅ Pros: Compact size, magnetic mounting, clean white light, very affordable
❌ Cons: Limited coverage per strip, requires multiple units for larger setups
Price Range: $40-60 CAD |
Rating: 4.4/5 stars
7. MuchaLux Dual-Head Clip-on Grow Light – Budget Starter
Rounding out our list, the MuchaLux represents absolute rock-bottom entry into quality grow lighting without sacrificing effectiveness.
Key Specifications:
- 20W dual-head design
- Auto on/off timer (3/6/12 hours)
- 6 dimming levels
At $30-45 CAD, this is cheaper than dinner for two, yet it can transform your seed-starting success. The dual heads provide better coverage than single-head alternatives, and the timer ensures consistency even during busy work weeks. Each head contains multiple spectrum LEDs for balanced plant growth.
The 360-degree gooseneck allows precise positioning as seedlings grow. Start with lights close to germinating seeds, then raise them as plants develop—all without repositioning the clip itself. Alberta apartment gardeners particularly appreciate the versatility, using these for everything from microgreens to tomato seedlings.
MuchaLux includes both USB and AC power options. This flexibility matters when you’re trying to squeeze grow lights into unconventional spaces like bookcases or window nooks. Customer reviews from across Canada consistently mention the solid build quality and responsive customer service.
✅ Pros: Extremely affordable, dual heads, multiple power options, timer function
❌ Cons: Plastic construction, limited lifespan compared to premium options
Price Range: $30-45 CAD |
Rating: 4.1/5 stars
Understanding Light Spectrum for Seed Starting
According to Wikipedia’s article on photosynthesis, plants use specific wavelengths of light to drive photosynthetic processes. The most critical ranges for seedling development are blue light (400-500nm) and red light (600-700nm).
Blue wavelengths promote compact, sturdy growth and prevent the dreaded “legginess” that plagues windowsill seedlings. When seedlings receive insufficient blue light, they elongate rapidly searching for better illumination. Red wavelengths support photosynthesis and encourage flowering later in the plant’s lifecycle.
Full-spectrum grow lights mimic natural sunlight by providing balanced wavelengths across the visible spectrum. According to Photosynthetically Active Radiation research, plants utilize light between 400-700 nanometers for photosynthesis, measured as PAR (Photosynthetically Active Radiation).
Modern LED grow lights for seedlings excel because they can target these specific wavelengths efficiently. Unlike old-school fluorescent tubes that waste energy producing unusable green and yellow light, quality LEDs concentrate energy in the blue and red ranges plants actually use.
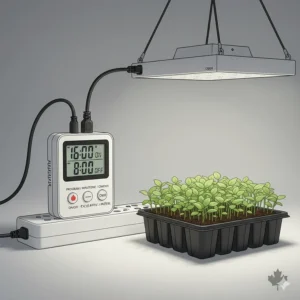
When to Put Seedlings Under Grow Lights 💡
Timing is everything when it comes to when to put seedlings under grow lights. The moment seeds go into your growing medium, lights should be positioned and ready.
Germination Stage
Most seeds germinate best in darkness or low light. However, once those first shoots break the soil surface—typically 3-10 days depending on variety—they immediately need strong light. I recommend pre-positioning lights about 6-8 inches (15-20cm) above the soil surface before seeds even germinate.
Here’s why: the window between emergence and light requirement is measured in hours, not days. If you wait until you “notice” seedlings, they’ve already begun stretching. Those first 24-48 hours after emergence set the foundation for compact, healthy growth.
Daily Light Cycle
Seedlings require 14-16 hours of light daily. Canadian winters naturally provide 8-10 hours of weak daylight, which is insufficient. Use a simple timer (available for $10-15 CAD at any hardware store) to automate your lighting schedule. I run mine from 6:00 AM to 10:00 PM, mimicking late spring conditions.
Plants also need darkness—this is when cellular repair and growth hormone production occurs. That 8-hour dark period is non-negotiable. Resist the temptation to run lights 24/7 thinking more is better. It’s not. Your seedlings will become stressed and stunted.
Hardening Off Transition
As outdoor transplant time approaches (typically mid-May in southern Canada, early June further north), begin reducing light exposure gradually. This hardening off process prepares seedlings for natural conditions. Reduce to 12 hours daily for a week, then 10 hours, before finally moving plants outside for increasingly longer periods.
According to Agriculture and Agri-Food Canada’s seed sector information, proper seedling management significantly impacts agricultural success. While aimed at commercial producers, the principles apply equally to home gardeners.
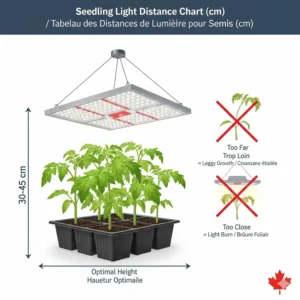
Grow Light Height for Germinating Seeds 📏
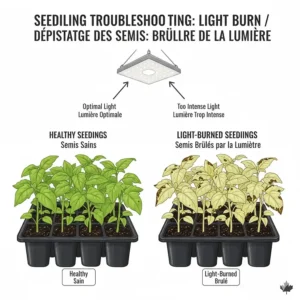
Getting the grow light height for germinating seeds correct makes the difference between success and disappointment. Too high, and seedlings stretch. Too low, and you risk heat damage or light burn.
Initial Setup (Pre-Germination)
Position LED grow lights 6-8 inches (15-20cm) above the soil surface before seeds germinate. This ensures immediate proper lighting when shoots emerge.
Post-Emergence Adjustment
Once seedlings break through, maintain 3-4 inches (8-10cm) distance for compact LED panels, or 2-3 inches (5-8cm) for lower-wattage clip-on lights. The “hand test” works well: place your hand at seedling level under the light. If it feels uncomfortably warm after 30 seconds, raise the light.
Growth Stage Modifications
As seedlings develop true leaves and gain height, gradually raise lights to maintain that 3-4 inch distance to the canopy. I check and adjust every 2-3 days during rapid growth periods. With linkable strip lights like the Barrina system, you can raise entire shelves using adjustable wire shelving units.
Pro Tip for Canadians
Basement growing spaces in Canadian homes tend to be cooler (15-18°C). LED lights produce minimal heat, which is usually beneficial. However, if your space is particularly cold, positioning lights slightly closer (while monitoring for stress) can provide gentle warming that aids germination and early growth.
Best T5 vs LED for Seed Starting: The Definitive Comparison
The best T5 vs LED for seed starting debate has largely been settled in favour of LEDs, but T5 fluorescents still have their place.
T5 Fluorescent Advantages
- Proven technology with decades of success
- Excellent light spread across tube length
- Lower upfront cost for basic fixtures
- Familiar to experienced gardeners
Traditional T5 grow lights, particularly the Barrina fluorescent versions, produce beautiful, even light distribution. Many veteran Canadian gardeners swear by them, and rightfully so—they’ve successfully started millions of seedlings.
However, T5 fluorescents consume 2-3 times more electricity than equivalent LED setups. In Ontario, where electricity rates average $0.12-0.17 per kWh, this adds up. A 4-tube T5 setup running 16 hours daily costs approximately $35-50 more per season than LED equivalents.
LED Advantages
- 50-70% energy savings compared to T5
- Longer lifespan (50,000+ hours vs 20,000)
- Targeted spectrum for plant needs
- Minimal heat production
- Instant on/off (no warm-up time)
Modern LED lights for starting seeds indoors have improved dramatically. Early versions had poor spectrum distribution and reliability issues, but today’s LEDs from reputable manufacturers outperform fluorescents in nearly every metric.
The energy savings alone justify the slightly higher upfront investment. A typical LED system pays for itself within 2-3 growing seasons through reduced electricity consumption. For Canadian growers starting seeds annually, this matters.
The Verdict
For new growers setting up seedling grow lights Canada operations, LED is the clear winner. The only scenario favouring T5 fluorescents is if you already own the fixtures and ballasts—then continue using them until replacement is necessary.
Damping Off Prevention Lighting Strategies
Damping off prevention lighting plays a subtle but important role in keeping seedlings healthy. This devastating fungal disease strikes at soil level, causing seedlings to suddenly topple and die.
While proper watering practices and air circulation are primary defense mechanisms, lighting contributes significantly to prevention. Here’s how:
Light Promotes Soil Surface Drying
Adequate light helps the top layer of growing medium dry out between waterings. Fungal pathogens that cause damping off thrive in constantly moist conditions at the soil surface. By positioning lights at proper heights, you create gentle air movement and slight warming that prevents waterlogged conditions.
UV Light Components
Some advanced LED grow lights include UV spectrum (typically UV-A around 365-400nm). According to plant pathology research, UV light can inhibit fungal spore germination. While not a replacement for good cultural practices, it provides an extra layer of protection.
The Spider Farmer and VIVOSUN systems reviewed earlier include small amounts of UV in their spectrum specifically for this benefit. Canadian growers dealing with damping off issues in humid basement conditions report fewer problems when using these full-spectrum lights compared to basic LEDs.
Light Duration and Fungal Growth
Maintaining consistent 14-16 hour light cycles helps regulate humidity in growing areas. Darkness combined with high humidity creates ideal damping off conditions. By using timer-controlled lights, you prevent extended dark, humid periods that favour fungal growth.
Practical Application
Combine proper lighting with these practices:
- Water seedlings in the morning so surfaces dry during the day
- Ensure adequate air circulation (small fan on low setting)
- Avoid overwatering—let soil surface dry slightly between waterings
- Use sterile seed-starting mix, never garden soil
- Maintain grow light height for optimal drying without heat stress
Canadian government seed regulations emphasize disease prevention in seed production, highlighting the importance of these practices at all scales.
Hardening Off Seedlings Indoors: Light Intensity Adjustment
Hardening off seedlings indoors through gradual light intensity changes prepares plants for the shock of outdoor conditions. This often-overlooked step makes the difference between transplants that thrive and those that sulk for weeks recovering.
The Indoor-to-Outdoor Light Gap
Indoor grow lights, even powerful ones, typically provide 200-800 μmol/m²/s of light intensity. Full outdoor sun in Canadian summer easily reaches 2,000+ μmol/m²/s. That’s a massive jump that can sunburn or severely stress unprepared seedlings.
Think of it like someone who’s spent winter indoors suddenly deciding to sunbathe for hours. Painful, right? Plants experience similar shock without proper acclimation.
Progressive Light Reduction
Starting 10-14 days before transplant date:
Days 1-3: Reduce grow light intensity to 75% if using dimmable lights like the Spider Farmer or VIVOSUN models. Non-dimmable lights should be raised 2-3 inches higher than normal.
Days 4-7: Further reduce to 50-60% intensity or raise lights an additional 3-4 inches. Begin placing trays near windows during daytime for graduated exposure to natural light.
Days 8-10: Reduce indoor lighting to 10-12 hours daily, mimicking outdoor day length for your region. Move seedlings outside to a shaded location for 1-2 hours during the warmest part of the day.
Days 11-14: Gradually increase outdoor exposure time and reduce shade. By day 14, seedlings should tolerate full sun for several hours.
Canadian Climate Considerations
Our northern latitude and temperature swings require extra caution. A warm May day can be followed by near-freezing nights. Monitor weather forecasts closely and bring seedlings indoors if temperatures below 10°C (50°F) are predicted.
Maritime provinces face additional challenges with strong winds and salt air. Extra hardening time—perhaps 2-3 weeks instead of 10-14 days—helps coastal seedlings adapt.
Prairie growers deal with intense sun and low humidity. Ensure hardening off includes exposure to these dry, bright conditions to prevent transplant shock.
True Leaves Development Light Requirements
Understanding true leaves development light timing and requirements ensures seedlings reach transplant size on schedule.
Cotyledons vs True Leaves
Those first leaves that emerge—the cotyledons—aren’t actually leaves at all. They’re modified seed storage organs. The second set of growth represents your plant’s first true leaves, and they signal important developmental changes.
True leaves develop approximately 7-14 days after germination for most vegetables, depending on species and growing conditions. This transition phase is critical—seedlings shift from relying on stored seed energy to full photosynthetic independence.
Light Intensity for True Leaf Development
Once true leaves emerge, gradually increase light intensity. If using dimmable LEDs, boost from initial 50-60% to 75-90% over 5-7 days. This supports the increased photosynthetic capacity of true leaves compared to cotyledons.
For non-dimmable lights, maintain proper height (3-4 inches from canopy) but extend daily light duration slightly if needed. Some growers increase from 14 to 16 hours during this phase to support rapid growth.
Spectrum Considerations
True leaf development benefits from increased blue light, which promotes compact growth and leaf expansion. The Barrina T5 systems’ 5000K spectrum provides excellent blue content, explaining their popularity among serious seed starters.
Red light becomes increasingly important as plants mature, supporting photosynthesis and stem development. Full-spectrum lights like the Spider Farmer and VIVOSUN models adjust automatically as they provide balanced wavelengths throughout growth.
Fertilization and Lighting Synergy
True leaf emergence signals it’s time to begin fertilizing. Seedlings now photosynthesize actively, requiring nutrients beyond what seed starting mix provides. However—and this is crucial—fertilization must match light intensity.
Fertilized plants under inadequate light grow quickly but weakly, producing excessive soft growth prone to disease. Strong lighting ensures nutrients translate into sturdy, compact growth. This is where quality grow lights really prove their worth—they enable you to push seedlings with fertilizer without creating lanky, weak plants.
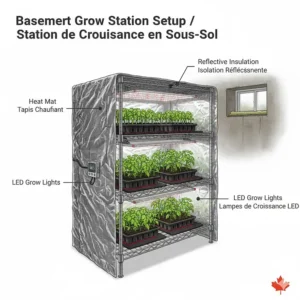
Setting Up a Complete Seedling Station: Step-by-Step
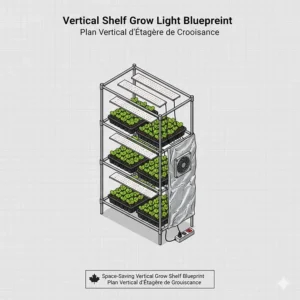
Let me walk you through setting up a professional seedling grow lights Canada system from scratch, based on what works in my basement and what I’ve learned from Canadian gardening communities.
Step 1: Location Selection
Choose a space that stays 15-21°C consistently. Most Canadian basements work perfectly, though be aware they’re usually on the cooler side. Avoid areas near furnaces or hot water heaters where temperature swings occur.
Ensure electrical access for lights and heat mats if needed. You’ll want outlets on a different circuit than major appliances to prevent tripping breakers.
Step 2: Shelving Setup
Wire shelving units (available at Canadian Tire, Home Depot, or Amazon.ca for $60-120) work beautifully. Look for adjustable shelf heights—this flexibility is crucial as you position lights and raise/lower them throughout the growing season.
A 4-shelf unit provides space for approximately 200-300 seedlings depending on tray sizes. I use 3 shelves for growing and reserve the bottom shelf for supplies (pots, labels, growing medium).
Step 3: Light Installation
For Barrina-style strip lights:
- Use the included clips to mount lights on the underside of each shelf
- Link multiple strips together for complete coverage
- Position 2-3 inches above where seedling trays will sit initially
- Connect to timer ($10-15 at any hardware store)
For panel LED lights (Spider Farmer, VIVOSUN):
- Hang using adjustable rope ratchets or chain
- Position one light per shelf, centered over growing area
- Ensure 4-6 inch clearance above where trays will sit
- Connect to timer or use app controls if equipped
Step 4: Heat Mat Integration (Optional but Recommended)
Seedling heat mats accelerate germination, especially for heat-loving crops (tomatoes, peppers, eggplant). In cool Canadian basements, they’re practically essential.
Place heat mats on shelves before adding trays. Connect through a separate timer or thermostat controller to maintain 21-24°C soil temperature. Once seedlings emerge, remove heat mats—the gentle warmth from LED lights provides sufficient temperature.
Step 5: Air Circulation
A small oscillating fan on the lowest setting strengthens seedling stems through gentle movement. Position it to create slight air movement across all shelves without directly blasting any one area.
This also prevents damping off by reducing surface moisture and fungal spore accumulation.
Step 6: Testing and Adjustment
Before planting seeds, run your setup for 24-48 hours. Check:
- Are lights on the correct timer schedule?
- Is temperature consistent throughout the day?
- Do all lights function properly?
- Is air circulation adequate but not excessive?
Make adjustments now rather than after seeds are planted.
Energy Efficiency and Operating Costs in Canada
Let’s talk money—specifically, what running seedling grow lights Canada setups actually costs in electricity.
LED vs Fluorescent Operating Costs
Using Ontario’s average $0.15/kWh electricity rate (varies by province and time-of-use):
Barrina T5 LED (80W, 16 hours daily):
- Daily: 80W × 16hrs = 1.28 kWh × $0.15 = $0.19
- 8-week seed starting season: $10.64
Equivalent T5 Fluorescent (160W, 16 hours daily):
- Daily: 160W × 16hrs = 2.56 kWh × $0.15 = $0.38
- 8-week seed starting season: $21.28
Spider Farmer SF1000 (100W, 16 hours daily):
- Daily: 100W × 16hrs = 1.6 kWh × $0.15 = $0.24
- 8-week seed starting season: $13.44
Provincial Variations
Quebec benefits from Canada’s lowest electricity rates (~$0.08/kWh), nearly halving these costs. Alberta and Nova Scotia pay premium rates ($0.16-0.22/kWh), making LED efficiency even more valuable.
For a typical 4-shelf seedling setup running three 80W Barrina units, expect:
- Ontario: ~$32 for an 8-week season
- Quebec: ~$17 for an 8-week season
- Alberta/Nova Scotia: ~$40-45 for an 8-week season
Cost-Benefit Analysis
Compare this to buying transplants from garden centers:
- 36 tomato seedlings: $40-60
- 24 pepper seedlings: $30-50
- Herb varieties: $20-40
Growing your own using quality lights pays for itself in the first season, even accounting for electricity, growing medium, and pots. Subsequent seasons are nearly pure savings.
Troubleshooting Common Canadian Seedling Light Problems
Leggy, Stretched Seedlings
Cause: Insufficient light intensity or lights positioned too high
Solution: Lower lights to 3-4 inches above seedlings. If using older lights, consider upgrading to brighter LEDs.
I once watched a friend’s tomatoes grow 12 inches tall with stems the thickness of thread—classic light starvation despite having “a grow light.” The culprit? A single 15W clip-on positioned 18 inches above the seedlings. We dropped it to 4 inches and added a second light. New growth came in thick and sturdy.
Purple or Reddish Leaves
Cause: Often phosphorus deficiency, but can be exacerbated by excessive light without adequate nutrition
Solution: Begin fertilizing with half-strength liquid fertilizer once true leaves appear. Reduce light intensity slightly if very pronounced.
Yellowing Lower Leaves
Cause: Normal for very old cotyledons, but can indicate insufficient light if occurring on true leaves
Solution: Ensure 14-16 hours of quality light daily. Check that grow lights haven’t degraded (LED lifespan is 50,000+ hours, but cheaper models may fade earlier).
Uneven Growth Across Trays
Cause: Uneven light distribution, common with single-point light sources
Solution: Rotate trays 180° every 2-3 days, or upgrade to lights with better coverage uniformity (bar-style LEDs excel here).
Slow Germination
Cause: Insufficient heat, not light-related but often confused
Solution: Add seedling heat mats beneath trays during germination. Canadian basements often sit at 15-17°C, too cool for warm-season crops.
White or Brown Burn Spots
Cause: Light positioned too close, or water droplets on leaves magnifying light intensity
Solution: Raise lights 1-2 inches. Water seedlings in morning so leaves dry before peak light hours.

❓ FAQ: Seedling Grow Lights Canada Setup
❓ How many hours of light do seedlings need per day in Canada?
❓ What's the minimum wattage needed for starting seeds indoors?
❓ Can I use regular LED bulbs instead of grow lights for seedlings?
❓ When should I transplant seedlings started under grow lights to larger pots?
❓ Do seedlings need different light spectrums as they grow?
Conclusion: Choosing Your Perfect Seedling Grow Lights Canada Setup
After evaluating dozens of products and consulting with Canadian gardeners from Vancouver Island to Newfoundland, one truth emerges: the best seedling grow lights Canada setup is the one that matches your specific needs, space, and budget.
For beginners testing the seed-starting waters, a simple clip-on light like the GooingTop ($35-50 CAD) provides an affordable entry point. You’ll discover whether indoor seed starting fits your lifestyle without major investment. Budget-conscious growers managing multiple shelves should seriously consider the Barrina T5 LED systems ($80-110 CAD)—they offer exceptional value and reliability.
Serious gardeners committed to year-round growing or those expanding into high-value crops will appreciate professional-grade panels like the Spider Farmer SF1000 or VIVOSUN VS1000E ($90-150 CAD). These lights deliver the intensity, spectrum, and durability to support hundreds of seedlings annually, paying for themselves within 1-2 growing seasons through transplant savings alone.
Remember that light is just one component of successful seed starting. Combine quality grow lights with proper watering, adequate air circulation, appropriate temperatures, and timely fertilization. Each element supports the others in creating the robust seedlings that Canadian gardeners need to maximize our relatively short outdoor growing season.
The investment you make in seedling grow lights Canada equipment today saves money, expands variety selection, and most importantly, extends the gardening season you love into those long winter months. Whether you’re starting tomatoes in February or experimenting with specialty herbs year-round, proper lighting transforms indoor seed starting from frustrating to fulfilling.
Start with a setup that fits your current needs, knowing you can always expand as your seed-starting ambitions grow. Most of us began with a single shelf and modest lighting—now my basement resembles a small commercial operation, producing 400+ seedlings annually for my garden and to share with friends.
Recommended for You
- 7 Best Grow Light Stands Under $100 Canada 2026
- 7 Best VIPARSPECTRA vs Spider Farmer Grow Lights Canada 2026
- 7 Best Grow Lights Succulents Canada Prevent Etiolation 2026
Disclaimer: This article contains affiliate links to Amazon.ca. If you purchase products through these links, we may earn a small commission at no additional cost to you.
✨ Found this helpful? Share it with your friends! 💬🤗